WhiteMagic Adventure Blog
Stok Kangri summit day : An Illustration
Stok Kangri summit day : An Illustration
Stok Kangri is a popular 6000m peak in Ladakh which acts as a great introduction to high altitude climbing. The access to the peak is easy with a short drive to the road head from Leh, capital of Ladakh which has an airport. There are multiple trails to get to the base camp of Stok Kangri, the quickest of which can get you up there in just two days which we strongly advice against doing unless if you have already spent enough time at high altitude and are well acclimatized.
The summit attempt of Stok Kangri is completely non technical and is free of any objective dangers but is not as easy as what a lot of people might imagine it to be. The summit day is a long one where you climb approx 1200m/3900ft (vertical) which is more than summit days on a lot of peaks, including Everest.
Here, we have done a breakdown of the climb from Base Camp to the Summit of Stok Kangri into various sections to help you get mentally prepared for it. To benefit from this we suggest that climbers look at each section as a stage of the climb and focus on completing one stage at a time.
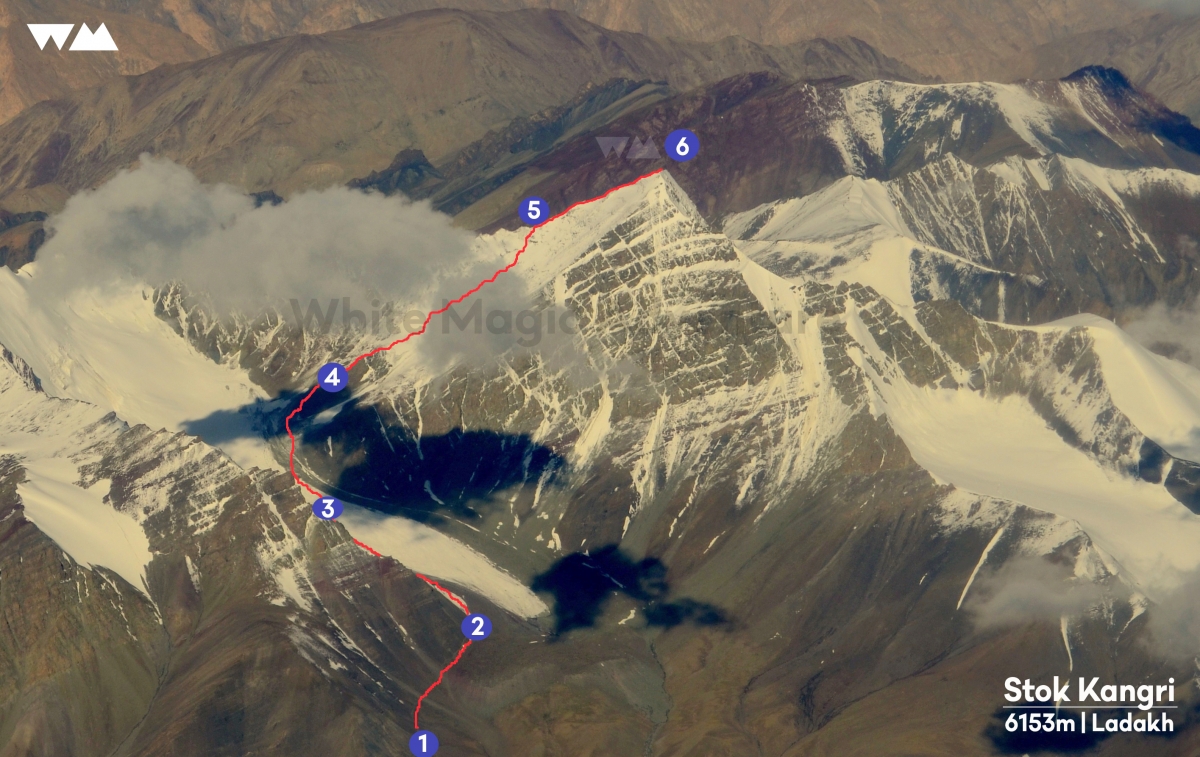
Legend -
1 : Spur above Base Camp
2 : Pt where the trail meets the Stok Glacier / Old High Camp
3 : Glacier crossing point
4 : Start of the snow slope/ SE Face
5 : South Ridge/ Shoulder
6 : Summit
1) Base Camp to Spur above BC –
Ave Walking time: 30-45min
Gradient : 23%
Elevation Gain - 150m
Distance Travelled - 650m

When you arrive at Base Camp you see a trail going up a gravelly slope. There are climbers going up and down this section and most people would have probably climbed it during their acclimatization hikes around base camp. You don’t see the mountain from the base camp and will have to climb this spur to get a view of what lies ahead. The spur is marked by prayer flags and you get a good bird’s eye view of the Base Camp and Leh town from here.
When you are climbing the mountain, you normally head out from base camp at 4975m in the middle of the night and hence in subzero temperatures most times. The initial stretch from base camp to the spur with an elevation gain of 150m acts as a great warm up. This section should take 30-45mins depending on your speed. In the night the valley below is flooded with lights and peak stands tall to your left.
TIP: Treat this as a warm up. Have a sip of water and remove a layer if you are feeling hot already.
2) Spur to the Glacier
Ave Walking time: 60-75min
Gradient : 16%
Elevation Gain - 215m
Distance Travelled - 1.35km
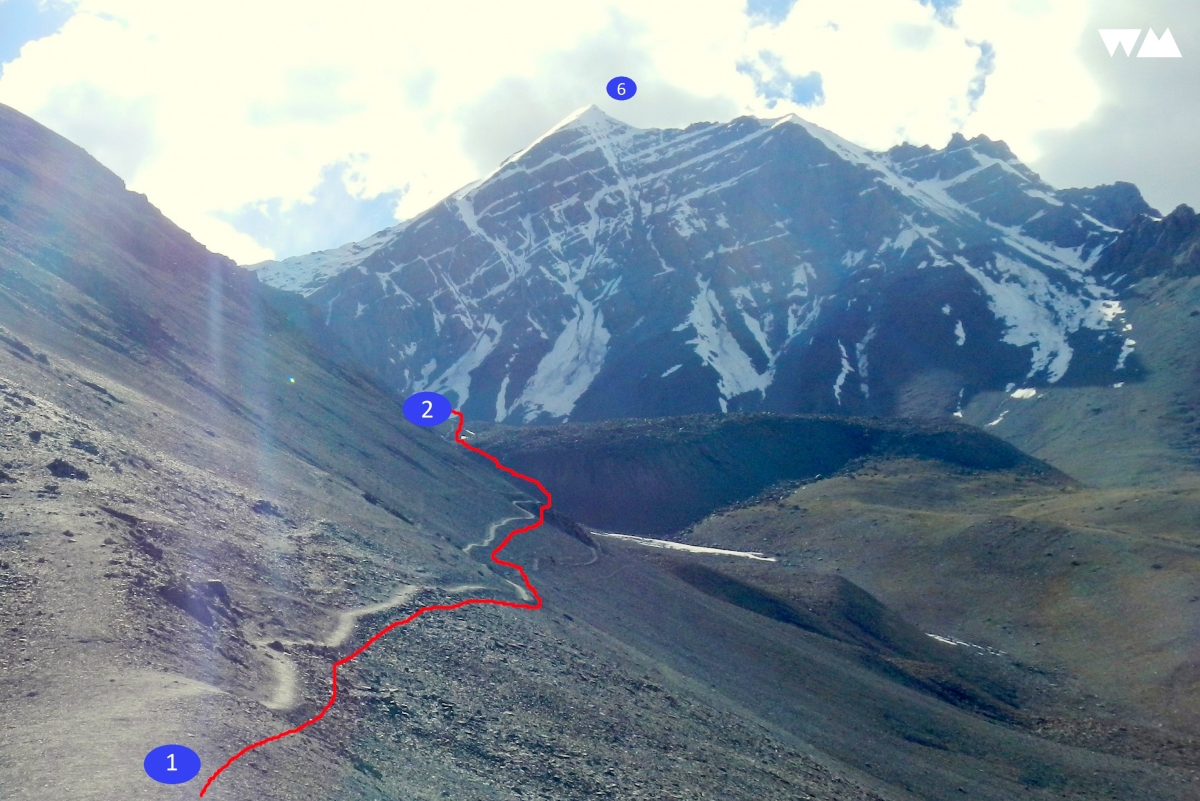
This section onwards there might be some snow depending on the season. If you are on the mountain in June or early July you might get some snow from this point onwards but for most season from mid July onwards, this stretch too is a trail on loose gravel with a bit of snow as you near the glacier. On this entire section you are traversing an easy gradient slope towards the glacier. Even though the elevation gain isn’t much, this stretch should take another 60-75 minutes as it is a relatively long distance. As you get close to the glacier the trail gets a little steeper and turns left sharply to open up a huge glacial valley ahead. This point is marked by some prayer flags and there are some flat spots nearby where some people could camp till a few years ago. More recently due to environmental concerns people no longer get permission to camp anywhere above Base Camp.
TIP: Use this section to get into a nice rhythm!
3) Glacier – Glacier Crossing Point
Ave Walking time: 25-40mins
Gradient : 13.5%
Elevation Gain - 95m
Distance Travelled - 700m
In this section you walk along the true right of the glacier. This part is almost flat but you are now walking on glacial moraine. You might get snow or patches of glacial ice which can be managed without putting on your crampons as the gradient is very less.
TIP: It’s still dark and those rocks are loose, be careful where/ how you step!
4) Glacier Crossing Point – Foot of the South East Face
Ave Walking time: 60-90mins
Gradient : 26%
Elevation Gain - 180m
Distance Travelled - 680m
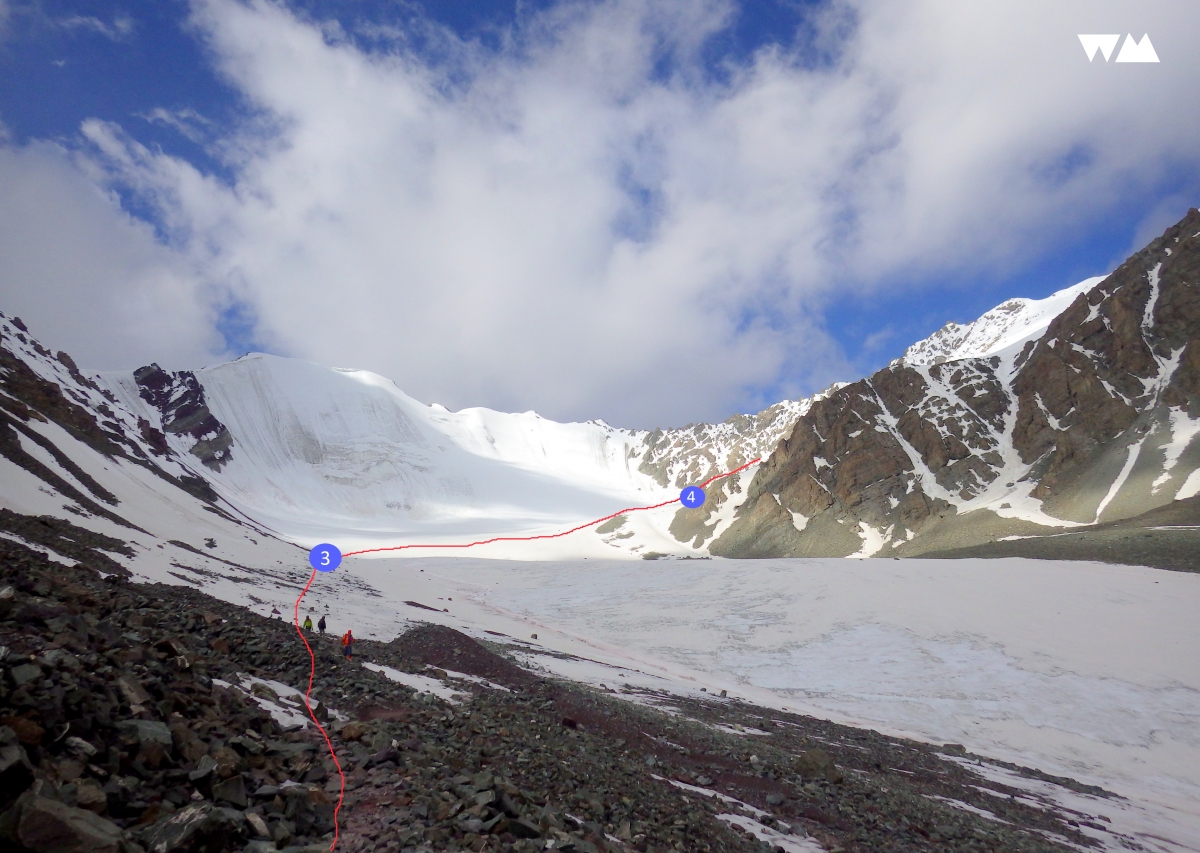
You start crossing the glacier on crisp hard ice with your vision limited to the light of your headlamp. You will find a couple of glacial streams - which should not be confused for crevasses - as you are crossing. You hit a patch of loose rocky moraine on the other side of glacier and the big climb to the top of Stok starts from this point. The rocky patch is short but needs to be climbed carefully as it is very loose and gets slippery at times. You should be vary of verglas - a thin layer of slippery ice - on the glacier and the rock patches as it is overlooked many times and people slip and fall on it. The entire section should take another 60-90 minutes at the most.
TIP: Don’t get too excited!
5) Foot of the SE Face to South Ridge (shoulder as its populary known)
Ave Walking time: 2.0-3.0 hours
Gradient : 37%
Elevation Gain - 350m
Distance Travelled - 940m
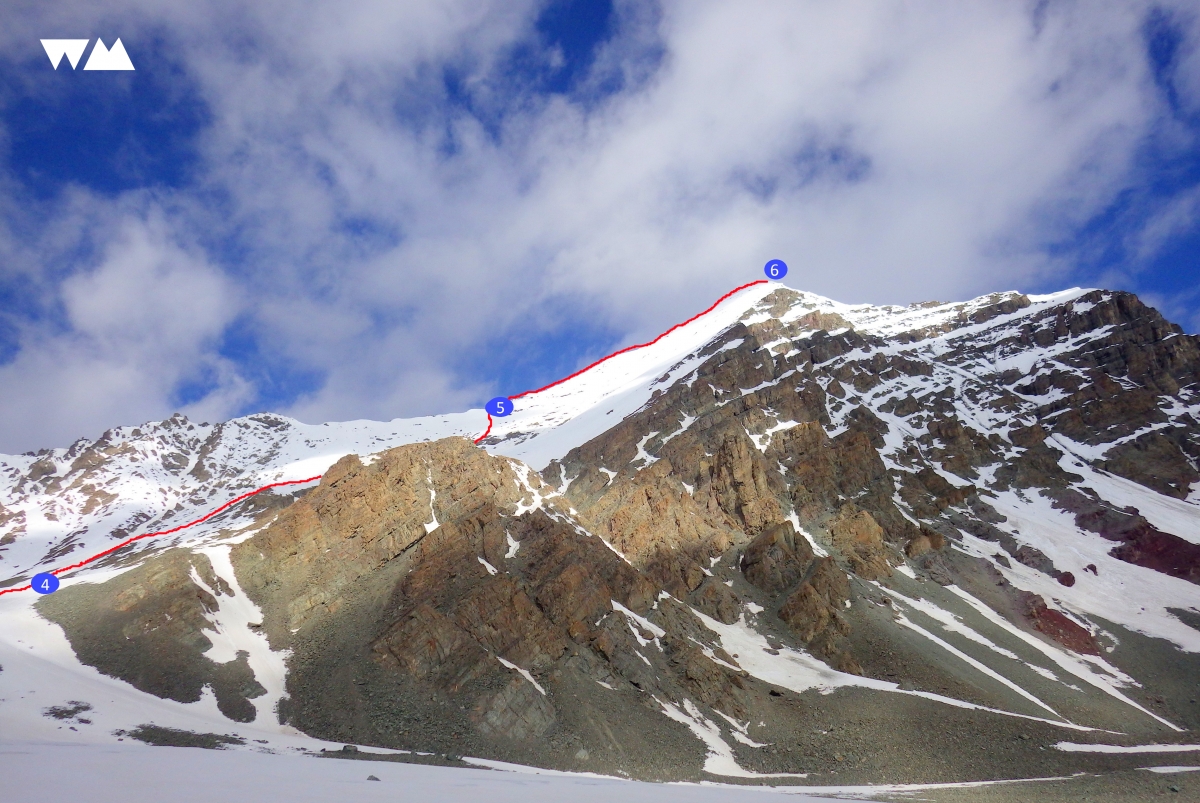
This section is probably the toughest and is the crux of the climb. You are now at about 5500m / 18000ft + and hence the altitude will be felt at each step. You are now on the SE Face of the mountain which is steep and the incline throughout the 350-400m section is 40 deg or so. Depending on the snow conditions you can rope up with your team as you climb the face and it is highly recommended if the conditions are not ideal. It is very easy to get out of breath on this section so it is important to pace yourself right and not to look too far ahead. Focusing on just the next step you are going to take helps. You will need an ice axe early in the season but even otherwise, you should atleast have hiking poles as it greatly helps during this part of the climb.
As you go higher you will be closer to day break and depending on what time you have left base camp and your pace you can witness a breathtaking sunrise from the ridge or wherever you are. Day break is without a doubt a highlight of climbing any Himalayan peak. It brings in positive energy, its warmer now, you can see the sky and the summit doesn’t look that far.
Most people would have a snack and something to drink here before starting the final section to the summit.
TIP: Slow yourself down, don’t give up!
6) Shoulder to Stok Kangri Summit
Ave Walking time: 1.5 - 2.5 hours
Gradient : 30%
Elevation Gain - 200m
Distance Travelled - 650m
90% of the people who have made it this far will reach the summit. The final section to the summit is on a ridge with exposure on both sides and hence roping up is a must. During the early part of the climbing season there will be snow here but you might get dry patches later on in the season. The climb is sustained and altitude will now have a great effect on your body. All along you will have great views. If you are not amongst the fastest you will start to see people coming down and motivating you to carry on. If you are amongst the fast ones, and happen to meet some slow climbers going up on narrow sections, pls wait for them to go up on narrow sections before you start descending.
As you start seeing the summit (prayer flags), the gradient increases and you suddenly have quite a bit of snow & ice. Your mental and physical will be tested as you take the last few steps towards the summit only to forget all the pain in a few minutes and enjoy as you stand on top of a Himalayan peak!
TIP: Don’t look up towards the summit, instead look down and see high you have climbed!

From the summit, you get a 360' view of the mountains with the Karakoram range beyond the Kardhung La to your north, mountains of Zanskar to the west and towards the Chang La and Changtang and brown hill rolling on towards Tibet. At the end, the views and the feeling of summiting a mountain will make you feel that it was worth all the effort!
You have reached the summit of the mountain but that’s only job half done. You still have to get down to Base Camp safely. Remember that most accidents happen on the way down, so don’t lose your focus as yet.
You should note that mountains are ever changing and the conditions too change along with it. The details mentioned in the post are to give you a general idea about the summit day. Each year the route is slightly different and the amount of snow/ ice you would get on the mountain is completely unpredictable. That would also dictate if you would need crampons or not and if you do then at which point you must wear your crampons. Wherever it be, it is important that you do it quickly as the cold gets to your fingers and they can take a long time to get warm again. We suggest that you practice wearing your crampons a few times before the summit attempt.
Apart from the snow conditions etc the weather also has a significant bearing on how the climb would turn out to be. So it is important to know and understand the conditions and have an experienced guide who understands your capabilities, the inherent risks of the activity and who can take the right decisions for you……..and we hope you all know where to find the best guides :)
Also, spending enough time acclimatizing is crucial before you arrive at base camp.
GENERAL TIP: Climb with good guides :)
Happy Climbing!
Click to have a look at our upcoming Stok Kangri departure.
Add new comment